Tuesday, August 18, 2015

Did You Miss It???

My wife and I took a trip this past weekend with a large portion of it being photography.  For this particular weekend I brought an old friend along, my Nikon 100mm f/2.8 Series E.  I haven't used this lens much since going to digital.  It is manual focus, and without the electronic interface, my D5200 doesn't even know it is there.  This means that along with manual focus there is no exposure metering either so you have to revert to the "Sunny 16" rule.

Nikon 100mm f/2.8 Series E - Front
Camera: Droid MAXX
Lens: N/A
Focal Length: N/A
Shutter: N/A
Aperture: N/A
ISO: N/A
Flash: N/A
Regardless of the extra effort required, I really enjoyed shooting with the old 100mm.  When I was talking with Karla about it and the added enjoyment it was providing I realised she missed it! 


Nikon 100mm f/2.8 Series E on a Nikon D5200
Camera: Droid MAXX
Lens: N/A
Focal Length: N/A
Shutter: N/A
Aperture: N/A
ISO: N/A
Flash: N/A
You see, Karla got into photography after I had made the switch to digital photography.  All her SLRs have been digital and fully automated.  While she uses the PSAM modes like a pro, she has never experienced a full manual camera with real manual focus lenses.  Back when I was using my all manual SLRs I always looked forward to getting more automated SLRs.  And now that I have them, did I lose something?


Nikon 100mm f/2.8 Series E - Rear
Camera: Droid MAXX
Lens: N/A
Focal Length: N/A
Shutter: N/A
Aperture: N/A
ISO: N/A
Flash: N/A
Now I know that my automated SLR allows me to focus on what I am shooting and not worry so much about the camera's settings, but did the experience become something less?  I think in the end it did, and having less automation allows me to slow down and even take more care in my shots.  And I enjoy the experience of shooting that much more.  If you have never shot full manual you owe it to yourself to try a proper manual focus lens (AF lenses in manual mode aren't the same), and with third party manufacturers like Samyang producing some fantastic optics in manual focus package the opportunity to get a great lens cheap has never been better!

Wednesday, February 27, 2013

Beginner To Pro: Lesson 1 - Composition

Today is the start of a series dedicated to growing the photographer in you.  It will start with the basics and will slowly advance toward more complex and creative aspects of photography.  I am going to put these lessons together one by one in the order that they should be learned.  So welcome budding photographer!

If you have always enjoyed photography, but have never been completely satisfied with the results, this is for you.  Composition is the biggest defining factor of what turns a snapshot into artwork.  You don't need an expensive camera or lighting, what you need is composition.  Artwork has been made with pinhole cameras, cruddy Holgas, and even phones.

So what is composition?  There are a lot of so called "rules" to composition, but for every piece of art that follows the rules, there is one that breaks them too.  One of the more popular rules is the rule of 3rds.  This states that if you break your picture up into three sections vertically and three sections horizontally that you should put the focus of your picture on one of the lines that separate the thirds.  This does work to help make a lot of shots much better than they could have been if it wasn't followed, but one of the reasons it works is it makes you make a decision.  It makes you decide what is it that is interesting, and that is really what you should be thinking of.  This picture of the Space Needle shows the rule of thirds in action, the Space Needle itself is on one third line while the tree in the foreground is in another.  I didn't even think of the rule of thirds when taking this shot, I only thought of the composition, but it does show how that tool can be used to help as you start out.  Just remember not to be a slave to the rule, don't force it on all of your subjects if you don't think it works for it.
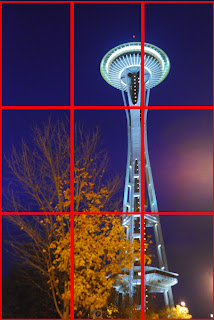
Rule Of Thirds
Camera: Nikon D80
Lens: Nikon 24-120mm f/3.5-5.6 AF-D
Focal Length: 28mm
Shutter: 1/6
Aperture: f/3.8
ISO: 1600
Flash: None
Think of this instead, when you go to take a photo what made you decide to take that photo, why are you there?  If you can decide why you wanted to shoot this particular subject in the first place, then you can compose an image around it.  Once you have decided what you want to shoot and why you want to shoot it, look at what potential distractions there are in and around your subject.  There may be too many to get that shot you really want, so what alternatives are there.  For instance, I love shooting vintage cars and motorcycles, and sometimes I happen upon them in parking lots.  I always feel lucky for the find, but then realization sets in, a parking lot (or car show for that matter) is the absolute worst place to shoot.  Why is that?  There are always too many distractions to get a clean shot of the full vehicle that you probably wanted.  Don't fret though, there are probably plenty of pictures of that same exact make and model vehicle, or whatever it is, everywhere.  What makes the one you are looking at unique?  Is there anything you can do different?  Once you know what it is, GET CLOSE.  When you are trying to separate something out and make it the focus there is no replacement for getting close.  Resist the urge to zoom in, zoom in with your feet.

So lets look at some examples of getting close to get the shot.  First we will start with this old Packard.  This car is just so interesting to me.  No real damage to be seen, but it has been withering away in the elements for a long time.  It is just a cool old car, but, in every angle there are ugly power lines, the tops of other buildings, no real way to get a clean shot of it.  Here is your typical 20 foot snapshot that most tourists would take of the car.  It will bring back the memory, but you probably aren't going to hang it on your wall.
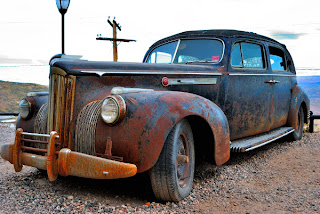
1941 Packard One Eighty
Camera: Nikon D80
Lens: Nikon 24-50mm f/3.3-4.5 AF-D
Focal Length: 24mm
Shutter: 1/100
Aperture: f/5
ISO: 100
Flash: None
Now when I really ask myself, what draws me to this car, it's the patina.  The rusting showing through the paint with that orange hue on otherwise undamaged bodywork.  It just shows how long that it has been here.  The fact that it sits in front of a haunted hotel all the better.  So I decided that since the patina attracted me, that is what I want to see.  I focused on several areas around bits that were interesting.  Badges, lights, etc... obviously not just the side of the door.  After getting several shots I found what I was looking for.  Working within mere inches of the car with a 24mm lens (on DX so 36mm equivalent) I produced this shot.
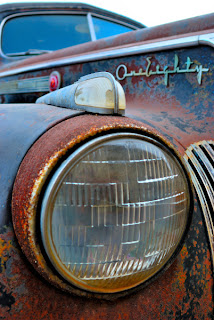
1941 Packard One Eighty
Camera: Nikon D80
Lens: Nikon 24-50mm f/3.3-4.5 AF-D
Focal Length: 24mm
Shutter: 1/100
Aperture: f/5
ISO: 100
Flash: None
I think you'll agree that by finding a piece that is interesting and different that I was able to produce a piece of artwork from a subject that would have otherwise been just a nice family trip snapshot.

This second set of examples is a motorcycle in my daughter's school parking lot.  I really liked the look of this bike.  It looks like a well ridden restored classic (when in actuality it is a well ridden 2003 model) that is really quite tough to find nowadays where every classic bike is either a restored show piece or really rough in dire need of a restore.  It is hard to find the look of an enjoyed every day but not ultra clean cycle, so I really wanted to get some shots of it.  The problem is it is in a school parking lot, worse yet it is parked next to a white truck that I can see from any angle shot from the left, and reflects in the fuel tank really well shot from the right.  Oh, and a modern scooter is in the spot with it.  Ugh.  This is the snapshot that I took at the start.
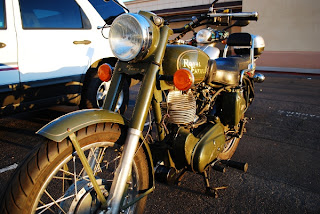
2003 Royal Enfield C5 Bullet
Camera: Nikon D80
Lens: Nikon 18-55mm f/3.5-5.6G VR
Focal Length: 18mm
Shutter: 1/60
Aperture: f/4
ISO: 100
Flash: None
So what is interesting about this bike.  Well, the tank is well worn while otherwise undamaged, so I like that. There is a bodge job fix to the external oiling system on the right side of the engine, and the dirty carburetor is on the right side of the engine as well.  But, probably the best item that is happening at the time of my shot is the sunset.  Now be careful, looking at the sun through your viewfinder is a very very bad idea.  Be very careful, I kinda work with my eye away from the viewfinder and scan around inside to frame my shot, but it means I will be making a few shots to get it just right.  In this case I wanted to have the sun cresting the tank just at the leading edge of the fuel cap.  As you can see from the shot, I think it worked.  There are still some distracting light poles and stuff in there, but I feel the rest of the shot overshadows the flaws enough that I have included it in my collection.
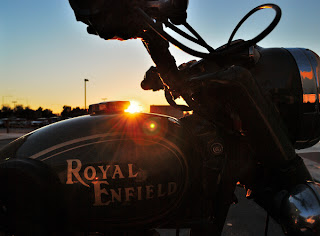
2003 Royal Enfield C5 Bullet
Camera: Nikon D80
Lens: Nikon 18-55mm f/3.5-5.6G VR
Focal Length: 18mm
Shutter: 1/60
Aperture: f/6.3
ISO: 100
Flash: None
Now that we've talked about getting close lets talk about GETTING LOW.  Changing the perspective can add interest to otherwise mundane everyday items.  We see our entire life from eye level, change your perspective.  The best thing about getting low is you don't need anything to do it, just a willingness to lay on the ground.  Some of my best shots have been made squatting or laying on the ground.  Take this shot for instance, one of my absolute favorites (and is my mom's favorite).  This is a set of plain sheet metal mailboxes.  Who cares, right?  What is holding them up is a Singer sewing machine treadle covered in vines. Now I could have shot them at eye level or at mailbox level and would have a nice shot to remind me of it.  But anyone else viewing wouldn't notice.  They'd walk by and wonder why I shot that and then hung it on a wall.  The treadle had to be the focus, so I laid in front of it and shot one of my favorite pieces.  Not only does it make the treadle stand out more, the perspective throws the casual viewer off kilter and makes them think, what did he do here.  A wide lens again makes sure that my close personal proximity to the subject brings it to the forefront of my shot.
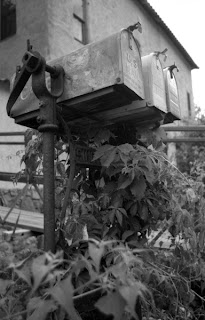
Mailboxes on Singer sewing machine treadle
Camera: Nikon F4
Lens: Nikon 24mm f/2.8 AF-D
Focal Length: 24mm
Shutter: N/A
Aperture: N/A
ISO: Ilford Delta 100
Flash: None
DON'T TRY TO COPY someone else.  The best way to make nothing is to try and copy someone else's style.  You are the artist, something drew you there, what is it.  My best example would be my fiance.  We were hiking in Sedona and I was carrying my camera as always, shooting items that jumped out at me as interesting.  As the sun was going down she told me to "shoot that".  I gave her the camera and she resisted at first, but as I told her, she is the one seeing the interest in the shot and she knows what she wants in her minds eye.  She went on to shoot what she saw, and I really like it.  She saw something I hadn't at the time, and she captured her vision.  
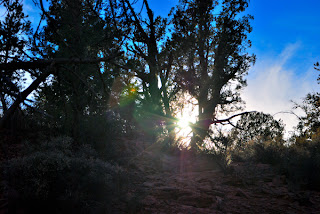
Sunset through trees
Camera: Nikon D80
Lens: Nikon 24-50mm f/3.3-4.5 AF-D
Focal Length: 18mm
Shutter: 1/400
Aperture: f/10
ISO: 100
Flash: None

Photo Courtesy of Karla Sapien
DON'T RELY ON ZOOM to make your frame.  Zoom lenses really spoil us.  The problem is that sometimes they make us lazy and uninteresting too.  I occasionally go out with nothing but a prime lens to reacquaint myself with the need to move to get the shot I want.  It is way too easy to just stand there and rotate the zoom ring until the framing is proper, there is a place for it but if you find you are always zooming to frame you may be cheating yourself out of better shots.  Sometimes it is needed, and when you are trying to match two greatly different sized objects (like a mountain behind people) they can be a godsend, but remember that your feet work too.  

In the end make sure you are being true to yourself and your vision, that is what makes you unique.  Show others how you see the world and what in this world interests you, there is a following out there for everything, even if what you find interesting is shooting the hands on clocks.  And if someone hates your work that is ok, good art should evoke dramatic feelings, and dramatic feelings will always leave people either loving or hating your work.  One of the (ahem) great things about the internet is that you are sure to hear about it when somebody hates your work.  And lastly never lose sight of the fact that photography should always be fun, if you aren't having fun then you're doing it wrong.

Thanks for reading.

Sunday, February 24, 2013

Nikkor 300mm f/4.5 Ai


Nikkor 300mm f/4.5 Ai
Camera: Nikon D80
Lens: Nikon 18-55mm f/3.5-5.6G VR
Focal Length: 55mm
Shutter: 1/60
Aperture: f/11
ISO: 560
Flash: SB-600 (w/ Gary Fong Lightsphere)
 Not all of us can afford the latest greatest lenses Nikon has to offer, so sometimes we have to make due.  When I go to sporting events I like to shoot them.  I happened to be going to a Phoenix Suns game but I was in the real nose bleed seats, 12 rows from the very top.  Not really a premiere vantage point for shooting the game, but I wanted to anyway.  I had nothing near long enough to do anything decent, so I snagged this Nikkor 300mm f/4.5 Ai for a steal of $159 through Adorama's used site.
Nikkor 300mm f/4.5 Ai
Camera: Nikon D80
Lens: Nikon 18-55mm f/3.5-5.6G VR
Focal Length: 55mm
Shutter: 1/60
Aperture: f/11
ISO: 140
Flash: SB-600 (w/ Gary Fong Lightsphere)
 On my Nikon F4 that I paired it with for that game it works very well.  It is of course manual focus, but it will operate in all the PSAM modes just fine.  My Nikon D80 that I use most often now is a different story.  You don't get any metering at all, so you are on your own with full manual exposure.  That being said, I can safely and successfully use this lens whenever the need arises.
Nikkor 300mm f/4.5 Ai
Camera: Nikon D80
Lens: Nikon 18-55mm f/3.5-5.6G VR
Focal Length: 55mm
Shutter: 1/60
Aperture: f/11
ISO: 450
Flash: SB-600 (w/ Gary Fong Lightsphere)
 This lens isn't very fast, 4.5 is slow.  Also, and probably the biggest detractor from this lens is close focusing.  It only focuses down to 13 feet.  So if you wanted to do any close-up work with it you will need to use extension tubes to do it.  But, since there aren't any electronics or AF, you can use them just fine.
Nikkor 300mm f/4.5 Ai
Camera: Nikon D80
Lens: Nikon 18-55mm f/3.5-5.6G VR
Focal Length: 55mm
Shutter: 1/60
Aperture: f/11
ISO: 500
Flash: SB-600 (w/ Gary Fong Lightsphere)
SPECS:
  • Focal Length: 300mm
  • Aperture: f/4.5 - f/22, 6 blades
  • Close Focus: 13'
  • Lens Type: Ai
  • Filter Size: 52mm
  • Weight: 39.8oz (1126g)
Shooting at my standard test target here.  Not quite as square as I'd like, but it will get the job done.  :-)
Nikkor 300mm f/4.5 Ai-S - Test Shot
Camera: Nikon D80
Lens: Nikkor 300mm f/4.5 Ai-S
Focal Length: 300mm
Shutter: 2 sec
Aperture: f/8
ISO: 100
Flash: None
 I really like the optics on this lens.  They are definitely crisp as you can see on this center crop of our test image.
Nikkor 300mm f/4.5 Ai-S - Test Shot
Camera: Nikon D80
Lens: Nikkor 300mm f/4.5 Ai-S
Focal Length: 300mm
Shutter: 2 sec
Aperture: f/8
ISO: 100
Flash: None
 And that crispness goes right to the edge of a DX frame.  A very slight red/green color shift can be seen at the edges of the black areas.
Nikkor 300mm f/4.5 Ai-S - Test Shot
Camera: Nikon D80
Lens: Nikkor 300mm f/4.5 Ai-S
Focal Length: 300mm
Shutter: 2 sec
Aperture: f/8
ISO: 100
Flash: None
If you can deal with all manual operation then this lens can really add to your arsenal for nearly the same price as an 18-55mm VR.  While I want to upgrade to a newer 300mm AF-S lens myself, I find it hard to justify when I look at what I can do with this lens.  If you don't mind going full manual, or you intend on using a full manual film camera then go for it!

Thanks for reading.

Saturday, February 23, 2013

Nikon 18-55mm f/3.5-5.6G VR DX


Nikon 18-55mm f/3.5-5.6G VR
Camera: Nikon D80      
Lens: Nikon 100mm f/2.8 Series E
Focal Length: 100mm
Shutter: 1/50
Aperture: f/8
ISO: 100
Flash: SB-600
View my Gallery of photos taken with the Nikkor 18-55mm f/3.5-5.6G VR DX.

In the short time I have used the Nikon 18-55mm f/3.5-5.6G VR, it has become my favorite DX lens.  It is light, gets fairly wide, and has VR so I can shoot hand held very slow.  At 18mm I have successfully shot this lens hand held at 1 second.  This is an AF-S lens so it will auto-focus on every Nikon auto-focus camera.  Being that it is DX it will not produce a full image circle on FX or film.  It is also a G lens which means no aperture ring, so cameras with no electronic aperture control cannot use this lens in "A" or "M" modes, but since all DX cameras have aperture control, this shouldn't be a problem.
Nikon 18-55mm f/3.5-5.6G VR
Camera: Nikon D80      
Lens: Nikon 100mm f/2.8 Series E
Focal Length: 100mm
Shutter: 1/50
Aperture: f/8
ISO: 100
Flash: SB-600
This lens is all plastic including the mount, so it is a lightweight.  The lens is shortest at about 30mm and focused to infinity.  The front element rotates with focusing and the lens gets longer as you get wider or longer than 30mm.  This lens does require a switch to be moved to go from auto-focus to manual-focus.  So far I have only used it in manual-focus for close-ups.  The manual-focus ring is really just a small line of knurls on the front element, but it is so easy and smooth it isn't a big deal.  What is a big deal is that the throw from closest to furthest focus is not much, only about 90 degrees.  I'm not sure if I'll manual focus much beyond focusing for closest focus.
Nikon 18-55mm f/3.5-5.6G VR
Camera: Nikon D80      
Lens: Nikon 100mm f/2.8 Series E
Focal Length: 100mm
Shutter: 1/50
Aperture: f/8
ISO: 100
Flash: SB-600
In my current arsenal this lens spends the most time on the camera, it is just perfect for low light and hand held.  I love wide angles so I wish it was 14-16mm on the wide end but that would make it much more expensive as well so 18mm is probably a good compromise.

SPECS:
  • Focal Length: 18-55mm
  • Aperture (18mm): f/3.5 - f/22, 7 blades
  • Aperture (55mm): f/5.6 - f/36, 7 blades
  • Close Focus: 6"
  • Lens Type: AF-S
  • Filter Size: 52mm
  • Weight: 9.4oz (265g)
Here are some test images for comparison.  This is the overall image and is shot at the closest focus distance, so only about 7 inches or so from the target.
Nikon 18-55mm f/3.5-5.6G VR - Test Shot
Camera: Nikon D80
Lens: Nikon 18-55mm f/3.5-5.6 G VR
Focal Length: 55mm
Shutter: 2.2 seconds
Aperture: f/8
ISO: 100
Flash: None
I don't see any discernible distortion in this shot.  Everything looks straight.

The next image is the very center at full resolution.
Nikon 18-55mm f/3.5-5.6G VR - Test Shot Center
Camera: Nikon D80
Lens: Nikon 18-55mm f/3.5-.6 G VR
Focal Length: 55mm
Shutter: 2.2 seconds
Aperture: f/8
ISO: 100
Flash: None
I am going to do some re-shoots, but all of my images shot at my "target" appear just a little soft.  This is the case even though the focus confirmation was lit.  Even though it is soft, it is nothing to worry about for most images and I don't let it bother me.

And this final image is from the left corner at full resolution.
Nikon 18-55mm f/3.5-5.6G VR - Test Shot Corner
Camera: Nikon D80
Lens: Nikon 18-55mm f/3.5-5.6 G VR
Focal Length: 55mm
Shutter: 2.2 seconds
Aperture: f/8
ISO: 100
Flash: None
A little softer still at the edge.  For most images it is a non issue.  If I want to make a large 50" print I'd see it, but I don't view 50" prints from closer than 6-7 feet, so it wouldn't be noticeable at that distance.

In the end I'd freely recommend this lens.  It is a lightweight go anywhere lens that can shoot most everything I shoot.  I've shot landscapes as well as waist-up portraits with it.  And hand held with VR it is a joy.  Most of the time you can get it kitted with a camera, so that makes it really cheap.  Are you a beginner?  If yes, just use this lens until you outgrow it.  I know that is hard to do, we all want new toys, but you'll progress faster just learning this lens and everything you can do with it first.

View my Gallery of photos taken with the Nikkor 18-55mm f/3.5-5.6G VR DX.

Friday, February 22, 2013

What's In My Bag: School Concert

Time for my daughters school concert?  Time for photography.  I've got enough flash to reach her, but that is disruptive so I am going without.  The Nikon D80 has ISO 3200 (Hi 1) so I am going to use that to get the shots.  Lens wise I would normally use my Nikon 70-210mm f/4-5.6 AF-n, but that lens wasn't available, so i am going old school with my Nikon 300mm f/4.5 Ai-S.  The 300mm Ai-S has no electronics or anything so the D80 doesn't like it.  No metering at all and no P, S, or A modes, strictly manual.  You'll need to use the histogram here to get your exposure set.
  • Camera: Nikon D80
  • Lens: Nikkor 300mm f/4.5 Ai-S
Concert - Playing Clarinet
Camera: Nikon D80
Lens: Nikkor 300mm f/4.5 Ai-S
Focal Length: 300mm
Shutter: 1/80
Aperture: f/4.5
ISO: 3200 (Hi 1)
Flash: None

Yep, as I write this I was trying to figure out what I forgot, nothing, that is all I brought.  Overall it worked well.  Being all manual made it a little more challenging, mostly in exposure, but as you can see I got the shots any parent would be proud to get.  
Concert - Portrait
Camera: Nikon D80
Lens: Nikkor 300mm f/4.5 Ai-S
Focal Length: 300mm
Shutter: 1/100
Aperture: f/4.5
ISO: 3200 (Hi 1)
Flash: None
Thanks for reading.

Thursday, February 21, 2013

What's In My Bag: Night Landscapes

Tonight I am going to South Mountain overlooking Phoenix to do some night photography.  For this I will definately need my tripod and a remote shutter release since most of my exposures will most likely be 30 seconds or longer.  For this I should only need one lens, my 18-55mm G VR, but for the heck of it I am also bringing along my 60 year old Kilfitt 400mm f/5.6 "FrankenLens".  Here is the rundown.
My intention was to get some cityscapes during sunset and early evening.  I spent most of my time shooting the 18-55mm f/3.5-5.6 G VR and it worked brilliantly.  Shooting between 30 seconds and 5 minutes I got some gorgeous shots.

Phoenix Arizona Cityscape at Sunset
Camera: Nikon D80
Lens: 18-55mm f/3.5-5.6G VR
Focal Length: 18mm
Shutter: 26.7 sec
Aperture: f/8
ISO: 100
Flash: None
Just to see what it could do I pulled out the Kilfitt 400mm f/5.6 "FrankenLens".  This is a lens that was given to me with the original mount boogered up to fit some unknown camera.  So I went ahead and bought some (ahem) high quality super cheap extension tubes and pressed a tube onto the mount.  These all screwed together so I was able to mix and match until I got the lens mounted at the correct distance from the focal plane.  It is definately a kludge job, but it works, and works quite well.  Here is a shot from the old Kilfitt...

Phoenix Arizona Cityscape Closeup at Sunset
Camera: Nikon D80
Lens:  Kilfitt 400mm f/5.6 "FrankenLens"
Focal Length: 400mm
Shutter: 3 sec
Aperture: f/8
ISO: 100
Flash: None
Overall not bad.  This was a good shoot, had the right equipment, and came home with some stuff I was proud of, and that is all you ever want.

Thanks for reading.

Wednesday, February 20, 2013

Shooting Digital? Choose The Right Film!

For me, this is what I find as the BIG TRAP of digital photography, and I fall into it myself.  Either you just start shooting and forget, or you figure it is digital and I can just fix it later.  The fact of the matter is that choosing the right settings (film) is just important in digital photography.  Sure you can fix it later if you shoot RAW, but if you shoot JPG no matter what you do you are throwing away information and quality, and why would you want to do either?  One just wastes time, and the other throws away quality, why did we spend the money on an expensive DSLR then.

When we shoot film, we choose it specifically for the job.  Want your colors to POP pick out a contrasty slide film like Velvia, shooting portraits grab something much smoother and finer.  We can do the same for our digital photography.

Personally when I am shooting landscapes, cars, or motorcycles, give me it all.  I turn everything up to get the color to scream.  Here are my settings for this on my Nikon D80:
  • Image Sharpening: +2 Medium High
  • Tone Compensation: Auto
  • Color Mode: IIIa
  • Saturation: +
  • Hue Adjustment: 0
Flowers
Camera: Nikon D80      
Lens: 18-55mm f/3.5-5.6G VR
Focal Length: 40mm
Shutter: 1/60
Aperture: f/5.3
ISO: 100
Flash: SB-600 (w/ Gary Fong Lightsphere)

As you can see, the only items I haven't changed are Tone Compensation and Hue Adjustment, and Tone Compensation may get changed, but so far it has worked well at Auto.

Now for shooting people this is a horrible setting.  For people I run something more like this:
  • Image Sharpening: -1 Medium Low
  • Tone Compensation: Auto
  • Color Mode: Ia
  • Saturation: Auto
  • Hue Adjustment: 0
Flowers
Camera: Nikon D80      
Lens: 18-55mm f/3.5-5.6G VR
Focal Length: 40mm
Shutter: 1/60
Aperture: f/5.3
ISO: 100
Flash: SB-600 (w/ Gary Fong Lightsphere)
So for people we need to run the subdued colors of Ia and a lot of sharpening pulled out.  Saturation is set to Auto, and you could go further and set it to - to really reduce it, but Auto seems to work well.

If you have been reading this blog you know that I am a firm believer of getting the shots straight out of the camera.  It saves me time not having to constantly fool and adjust every image.  I do shoot RAW+JPG (which some consider foolish, but space is cheap) but the RAWs are there specifically as a backup or if I just utterly screw up (I am human :-) ).  I use the RAW file usually only if the color still wasn't loud enough for me.  If I do manipulate I only manipulate RAWs.

So you still want to manipulate JPGs?  In case you didn't know manipulating JPGs is DESTRUCTIVE.  Here we'll take a look at it.  For this case I will start off with an image that is over exposed.
Waterfall
So you can see that this image is pretty well blown out.  This histogram is all off to the right confirming this.  So from here you'd want to fix this in your favorite image editing software.  If you are fixing the JPG maybe you'd do something like this.
Waterfall
Much better.  But what are all those gaps in the histogram?  Well, in order to stretch the data that was there it had to cut gaps into your shot.  Also those blown out pixels in the water, well, they are still blown out.  But what if you had the RAW file to work with?
Waterfall
The NEF really helps out here because it has data that the JPG doesn't.  So stretching out that histogram here retains a lot more information, and hey, a lot more of those blown out highlights are there now!  Awesome.  But why did I just waste several minutes making a useable image, when I could have got it straight from the camera.
Waterfall
No nasty blown out highlights, no gaps in my histogram (so no data loss), and best of all, no waste of my time.  This goes for everything, exposure (which I used here since I had the pics handy), color saturation, sharpness, etc.  Post production of all these items is a second rate solution.

In the end you'll do yourself a favor by setting up your camera to get the shots how you want them straight out of the camera.  For me, not wasting time manipulating images on a computer means I can be out shooting more, and that is what it is all about.

Thanks for reading!