Showing posts with label Technical. Show all posts

Wednesday, February 20, 2013

Shooting Digital? Choose The Right Film!

For me, this is what I find as the BIG TRAP of digital photography, and I fall into it myself.  Either you just start shooting and forget, or you figure it is digital and I can just fix it later.  The fact of the matter is that choosing the right settings (film) is just important in digital photography.  Sure you can fix it later if you shoot RAW, but if you shoot JPG no matter what you do you are throwing away information and quality, and why would you want to do either?  One just wastes time, and the other throws away quality, why did we spend the money on an expensive DSLR then.

When we shoot film, we choose it specifically for the job.  Want your colors to POP pick out a contrasty slide film like Velvia, shooting portraits grab something much smoother and finer.  We can do the same for our digital photography.

Personally when I am shooting landscapes, cars, or motorcycles, give me it all.  I turn everything up to get the color to scream.  Here are my settings for this on my Nikon D80:
  • Image Sharpening: +2 Medium High
  • Tone Compensation: Auto
  • Color Mode: IIIa
  • Saturation: +
  • Hue Adjustment: 0
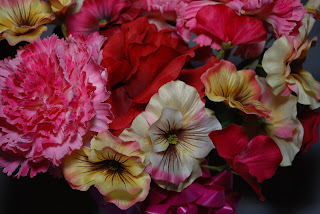
Flowers
Camera: Nikon D80      
Lens: 18-55mm f/3.5-5.6G VR
Focal Length: 40mm
Shutter: 1/60
Aperture: f/5.3
ISO: 100
Flash: SB-600 (w/ Gary Fong Lightsphere)

As you can see, the only items I haven't changed are Tone Compensation and Hue Adjustment, and Tone Compensation may get changed, but so far it has worked well at Auto.

Now for shooting people this is a horrible setting.  For people I run something more like this:
  • Image Sharpening: -1 Medium Low
  • Tone Compensation: Auto
  • Color Mode: Ia
  • Saturation: Auto
  • Hue Adjustment: 0
Flowers
Camera: Nikon D80      
Lens: 18-55mm f/3.5-5.6G VR
Focal Length: 40mm
Shutter: 1/60
Aperture: f/5.3
ISO: 100
Flash: SB-600 (w/ Gary Fong Lightsphere)
So for people we need to run the subdued colors of Ia and a lot of sharpening pulled out.  Saturation is set to Auto, and you could go further and set it to - to really reduce it, but Auto seems to work well.

If you have been reading this blog you know that I am a firm believer of getting the shots straight out of the camera.  It saves me time not having to constantly fool and adjust every image.  I do shoot RAW+JPG (which some consider foolish, but space is cheap) but the RAWs are there specifically as a backup or if I just utterly screw up (I am human :-) ).  I use the RAW file usually only if the color still wasn't loud enough for me.  If I do manipulate I only manipulate RAWs.

So you still want to manipulate JPGs?  In case you didn't know manipulating JPGs is DESTRUCTIVE.  Here we'll take a look at it.  For this case I will start off with an image that is over exposed.
Waterfall
So you can see that this image is pretty well blown out.  This histogram is all off to the right confirming this.  So from here you'd want to fix this in your favorite image editing software.  If you are fixing the JPG maybe you'd do something like this.
Waterfall
Much better.  But what are all those gaps in the histogram?  Well, in order to stretch the data that was there it had to cut gaps into your shot.  Also those blown out pixels in the water, well, they are still blown out.  But what if you had the RAW file to work with?
Waterfall
The NEF really helps out here because it has data that the JPG doesn't.  So stretching out that histogram here retains a lot more information, and hey, a lot more of those blown out highlights are there now!  Awesome.  But why did I just waste several minutes making a useable image, when I could have got it straight from the camera.
Waterfall
No nasty blown out highlights, no gaps in my histogram (so no data loss), and best of all, no waste of my time.  This goes for everything, exposure (which I used here since I had the pics handy), color saturation, sharpness, etc.  Post production of all these items is a second rate solution.

In the end you'll do yourself a favor by setting up your camera to get the shots how you want them straight out of the camera.  For me, not wasting time manipulating images on a computer means I can be out shooting more, and that is what it is all about.

Thanks for reading!

Thursday, January 17, 2013

VR (IS): Why You Want It On Every Lens

I'm not going to mince words here, VR (IS for Canon) is the absolute biggest advancement in photography in the last 20 years.  No other advancement has done anything to make your photos better.  Let me explain, every other advancement made has been an advancement in convenience, but they do not make your photos better.  Even digital, which is a huge advancement, only makes photography more continent, not better.  Sure, you can bring a tripod around, but why if you don't have to.  One of the hardest technical things to master will be shooting with very slow shutter speeds.

So for example, I can shoot reliably sharp photos with an 18mm lens at 1/10 a second without VR.  With VR I can shoot at 1 second and get it sharp.  To show the difference, here is a full size crop of fabric flowers at 1 second with no VR.
Camera: Nikon D80      
Lens: VR 18-55mm f/3.5-5.6G
Focal Length: 18mm
Shutter: 1/1
Aperture: f/5.6
ISO: 100
VR: Off
Flash: None


As you can see, the picture is useless, but now, the next shot all that is different is I flicked the VR switch on.  Still 1 second, still 18mm.
Camera: Nikon D80      
Lens: VR 18-55mm f/3.5-5.6G
Focal Length: 18mm
Shutter: 1/1
Aperture: f/5.6
ISO: 100
VR: On
Flash: None
That shot is sharp and good.

Now of course we could always use a big aperture instead.  For instance, I could use a 50mm f/1.8 instead of the VR 18-55mm f/3.5-5.6.  At 50mm the 18-55mm will have an aperture of about f/5.3.  Now Nikon claims you can shoot 4 stops slower shutter speed with VR, but even 3 stops will allow you the same exposure value as the 50mm.  For instance, if we follow the wives tale of shooting no slower than your focal length then the darkest light we would want to shoot in with ISO100 is EV8 which we would be at with ISO100, f/1.8, and 1/60sec.  With the 18-55mm at 50mm our aperture is 3 stops tighter at f/5.3, but because of VR we now can shoot 3 stops slower at 1/8sec to make up the difference and still have proper exposure for EV8.

An added benefit is that we don't have to change out artistic impression of a shot due to light.  As we learned in Aperture: Using Aperture To Focus Your Viewer, opening up the aperture shrinks our depth of field.  With VR we are now not locked into have our aperture determined by available light.  For me, it isn't even an option, if VR is available, then VR it is.  For instance, the Nikon's 55-200mm G is available in non-VR and VR versions, and even though there is a significant price break, non-VR isn't even an option for me.

I hope these articles are informative, drop me a line and let me know.

Thanks for reading.


Monday, January 14, 2013

Exposure Triangle: How To Make Those Nutty Numbers Work

The Exposure Triangle is an important concept to understand especially if you do any fully manual shooting.  It defines the interactions between the 3 determining factors of exposure.


In the previous lesson Stops: What Are All Those Numbers we learned about stops, and the numbering systems of Shutter Speed, ISO, and the Aperture.  Now we are going learn one other concept to help see how they interact together.

This concept is Exposure Value or EV.  The easiest definition of of EV is a value of light.  EV15 defines the light level of a typical sunny day.  Every EV value is separated by, you guessed it, a stop.  So EV16 is one stop more light (double the light) than EV15, EV14 is one stop less (half the light) than EV15.  So you can use EV to describe a light level.  To give us a reference point, EV0 = ISO 100 @ 1 sec @ f/1.  But EV0 does not have to be ISO 100 @ 1 sec @ f/1, but any combination that produces the same exposure.  If we increase the ISO to 200 we would now be at EV1, to get back to EV0 we need to change either the shutter speed to 1/2 sec or the aperture to f/1.4.

Camera: Nikon D80      
Lens: 24-50mm f/3.3-4.5G
Focal Length: 34mm
Shutter: 1/250
Aperture: f/4
ISO: 1600
Flash: None
Now lets see this in action. It isn't hard to see that even though the subject is the same, these two photos are drastically different. These shots were taken one after the other in the exact same conditions, but using the Exposure Triangle allows the manipulation of the shutter speed to either stop the water, or to have a nice smooth flow.
Camera: Nikon D80      
Lens: 24-50mm f/3.3-4.5G
Focal Length: 34mm
Shutter: 1/15
Aperture: f/4
ISO: 100
Flash: None


So the first shot is taken at ISO1600, 1/250sec, f/4 which is EV8.  To get to 1/15 of a second we need to slow the shutter speed by 4 stops (1/125, 1/60, 1/30, 1/15).  But just slowing the shutter speed won't do the job.  Since we slowed the shutter speed by 4 stops we are now 4 stops over exposed and are now adjusted for EV4.  What I chose to do was slow down the sensor by 4 stops (ISO: 800, 400, 200, 100) to get the exposure correct again and back to EV8.  I could have also reduced the aperture by 4 stops (f/5.6, f/8, f/11, f/16), or a combination of the two.

In this case our light level being EV8 gives us numerous options, these are some of the options for EV8:

  • ISO100, 1/15sec, f/4
  • ISO200, 1/30sec, f/4
  • ISO200, 1/15sec, f/5.6
  • ISO800, 1/30sec, f/5.6
All these provide the same exposure level but can dramatically effect the picture.  Look for the next article Aperture: Using The Aperture To Focus Your Viewer.

Thanks for reading!

Friday, January 11, 2013

Stops: What Are All Those Numbers


If you are new to photography, or maybe just new to more advanced cameras, you may have noticed something about the numbers on that camera.  They don't go evenly do they, some of them double as they get larger, and well the f/stops, well they're just funky all together.  The reason for all this numerical nuttiness is called stops, and everything in photography is measured in stops.  To understand stops you have to understand that photography is all about light, and more importantly, how much light is hitting your sensor.  All cameras have a sensor, be it film or electronic.  In order to get a properly exposed photo you have to have the proper amount of light reach the sensor and you do that by adjusting the light.

So what is a stop?  A stop is a measurement of light.  As you increase the light by a stop, you have just doubled the amount of light hitting the sensor.  As you decrease the light by a stop, you have just halved the amount of light.  That is the simplest definition.  But this will help you understand the numbers you are seeing.

Camera: Nikon D80      
Lens: VR 18-55mm f/3.5-5.6G
Focal Length: 55mm
Shutter: 1/60
Aperture: f/5.6
Flash: SB-600
The easiest number to understand is the shutter speed.  The numbers you will see are 1, 2, 4, 8, 15, 30, 60, 125, 250...  but this is only the denominator half of the number, so the real shutter speeds are 1/1, 1/2, 1/4, 1/8, 1/15, 1/30, 1/60, 1/125, 1/250.  These indicate how long the shutter will stay open in seconds and they are separated by stops.  So if your set at a shutter speed of 1/60 and you decrease the shutter speed to 1/30 then the shutter will remain open twice as long and doubling the light (one stop).  If you change your shutter speed from 1/60 to 1/125 of a second then the shutter will only remain open half as long and halving the light (one stop).  Clear as mud right.

Camera: Nikon D80
Lens: VR 18-55mm f/3.5-5.6G
Focal Length: 55mm
Shutter: 1/60
Aperture: f/5.6
Flash: SB-600
If you've shot with film, and probably with digital you've seen ISO numbers, even if you haven't known you have.  ISO 100, 200, 400, 800, 1600...  There are those doubling numbers again.  The ISO number tells you how fast your sensor responds to light.  This higher the number, the quicker the sensor responds to light. So lets say you are shooting ISO 400, if you move to a slower sensor of ISO 200 you will require twice as much light, if you move to a faster sensor of ISO 800 you will only require half as much light.

Camera: Nikon D80
Lens: VR 18-55mm f/3.5-5.6G
Focal Length: 55mm
Shutter: 1/60
Aperture: f/5.6
Flash: SB-600
The confusing number is the aperture or f/stop.  These numbers will look like 1, 1.4, 2, 2.8, 4, 5.6, 8, 11, 16, 22, 32.  These reference an adjustable hole (aperture) in the middle of the lens.  These numbers represent the diameter of the aperture.  Divide the focal length of the lens (i.e. 50mm) by the number and that is the diameter of the aperture.  So at f/2 the diameter in a 50mm lens will be 25mm.  At f/4 it will be 12.5mm.  And these again half and double the light.  If your lens is set to f/2.8 and you open it up to f/2 you just doubled the amount of light hitting the sensor, go from 2.8 to 4 and you just halved the light.  Simple.

But here is the absolutely best part of this article.  None of this junk matters!  While in future articles we will delve into the more creative aspects of shutter speeds and aperture settings this is just a primer.  I know when I got my first camera I was inquisitive and wanted to know what the heck all those numbers meant, and while there are reasons to know them, it isn't a requirement.  So if you aren't understanding them yet, don't worry about it, in the end it doesn't matter.

Next in the instructional series will be the Exposure Triangle: How To Make Those Nutty Numbers Work

Thanks for reading!